All though this was from 2005, I think it is still, essentially valid. Especially numbers 25 and 36.
CNN/Money's 50 Best Brewers
Do you want to start your own brewery or brewpub? Do you consider yourself a beer geek? Do you want to learn more on brewing, beer styles and trends?
Good, so do we.
We started this blog to compile all of our research on starting a brewery to use ourselves and to share with others who are going through the same process. And we might throw up some beer reviews and how-tos while we're at it!
Saturday, March 31, 2007
Thursday, March 29, 2007
Beer Reviews
Samuel Adams, Longshot 2006 "Boysenberry Wheat"
(Best Before: 06-07)
Pours like a traditional wheat, lots of fluffy white head that dissipates quickly with moderate lacing, cloudy as it should be. Upon smell, nose is walloped with boysenberry and faint hints of bubblegum and blackberry. The color is that of honey oak. Taste, unexpected hops on the side of the tongue that lasts a few seconds, which is followed by the grainy, cereal taste of wheat Chex. Esters come out with second taste along with moderate mouth feel. This is not a beer that I could drink six of; however, it must appeal to someone (my wife and Jim Koch) or they felt sympathetic for the Boston Brewery employee, who has been entering in their home brew contest for the past six years.
Grade: C- (would have been a D if on permanent rotation)
Sierra Nevada Pale Ale
(Best Before: no date)
Well, did it live up to the hype? Yes.
West Coast hops? Yes.
Aroma of grapefruit? Yes.
Excellent mouth feel? Yes.
Clean finish? Yes.
Lingering essences? Yes.
Classic model of an "extreme"/West Coast pale ale? Yes.
Grade: A+
Tuesday, March 20, 2007
St. Patrick's Day Brew-Ha-Ha
Hey all,
I promised you pics of the brewing process while making the American Pale Ale that you all voted on. Here we go!
First, I started on Friday night making a starter. The purpose of a starter is to generate more yeast cells so you have an ample amount when you make your big batch of beer. A starter is a super-small batch of beer (1 or 2 quarts) that is made by boiling some water and dried malt extract together for 15 minutes. After that, you cool it down to about 70 deg. F. and add your yeast to the mix and shake it all up. The shaking aerates the beer, which is the fuel necessary for the yeast to convert sugar to alcohol. Here's a pic of what it looks like when it is all said and done:
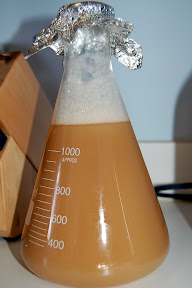
This sits out for about 12-18 hours at room temperature, until you are ready to "pitch" it. (Pitch means to pour in the wort [pronounced wert], which is described below...)
Now it's time to jump into business! Let me disclose this first: brewing is 90% being a janitor and 10% making a product. CLEAN, SANITARY CONDITIONS ARE AN ABSOLUTE MUST!!!
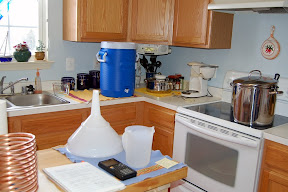
Mmm...clean
...on with the show.
First, we start off by putting our grains into a grain bag and tying it off. I chose a pale malt as my base (and the majority of brewers big and small do the same) and chose a nice crystal malt as my specialty malt to add color and a caramel/roasty flavor. That was set aside and I brought 9 and 1/3 quarts of water up to 166 deg. F. This was for my "partial mash", which, this weekend, was a first for me.
Mashing is best defined as: the reaction between enzymes and starch which produces fermentable sugars from malted barley. [Moore, 65]
After the water was up to temperture, I poured it into the ultra-high tech, specialized partial masher - a $15 Rubbermaid™ 5 gallon cooler.
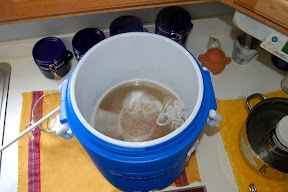
I let that sit for about 45 minutes with the cap securely fastened and wrapped in dish towels to conserve heat. In the mean time, I brought another 4 and 2/3 cups of water up to 180 deg. F. Once the water was getting on a roll, I performed the process of taking my sweet liquor from the coo...err, partial masher and poured it into my brewpot (carefully, no splashing!) and then put that back into the cooler (again, no splashing). This acts as a quick way to filter out big chunks of malt. As the liquid flows through the grain bed, the grains set and capture the big stuff so you can get a pretty clear wort before the big boil. (I kind of cheated on the last go-round as you can see in the pic below. I used a funnel with an ultra-fine strainer inside as a secondary filter.)
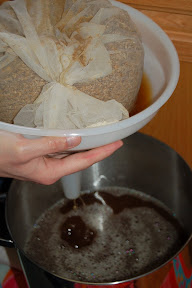
I took the additional water I heated and poured it over the grains as well. This acts as a poor-man's sparging. Sparging is where you take some water and sprinkle it over the grains to give them a final washing.
Once I had all of the wort collected, I brought it to a rolling boil (which took forever!) and added my first round hops for the start of the 60-minute boil.
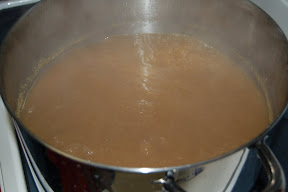
(The gunk on the side is the hops that have managed to splash up there from the boil.)
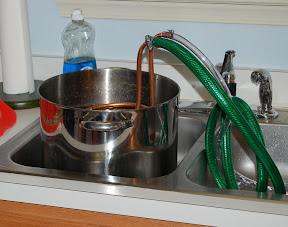
I added additional hops at the 15- and 0-minute marks for flavor and aroma, respectively. Also, at the 15 minute mark, I dropped in my new piece of equipment, the immersion chiller. This was to sanitize it for the next step. Cooling the wort.
The immersion chiller is about 25 feet of copper pipe with a garden hose or faucet attachment on one end and a drain tube on the other. You pump cold water from the faucet throught the tube which then exchanges heat from the wort to the copper to the water and goes out of the drain. A normal ice bath for cooling would take around 60 minutes to get the wort down to 70 deg. F. The immersion chiller took 8 minutes. I love that thing!
After the wort was at the right temperature, I transferred it to the fermenting bucket. Then back to the brew kettle. Then back to the fermenting bucket. Then back to the brew kettle. Notice a pattern here? Yeast needs oxygen as a fuel source kind of a like an internal combustion engine in our cars uses air and gasoline to make the car go. The yeast uses O2 and the sugar in the wort to make C2H5OH (ethanol) and CO2 (carbon dioxide). I topped off the fermenter to 5 gallons with some good, bottle water and proceeded to pitch the yeast. Afterwards, I put the top onto the fermenter, made sure it had a good seal and put the air lock on.
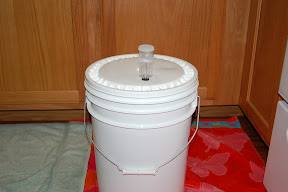
And wouldn't you know, just about 24 hours later, the air lock was bubbling like crazy - the yeast was having a party. And in a few weeks, we will too!
- I'll post an update this Friday as I transfer this elixir to the carboy (a big glass bottle) for it's secondary fermentation (allows for a cleaner, "filtered" beer) -
I promised you pics of the brewing process while making the American Pale Ale that you all voted on. Here we go!
First, I started on Friday night making a starter. The purpose of a starter is to generate more yeast cells so you have an ample amount when you make your big batch of beer. A starter is a super-small batch of beer (1 or 2 quarts) that is made by boiling some water and dried malt extract together for 15 minutes. After that, you cool it down to about 70 deg. F. and add your yeast to the mix and shake it all up. The shaking aerates the beer, which is the fuel necessary for the yeast to convert sugar to alcohol. Here's a pic of what it looks like when it is all said and done:

This sits out for about 12-18 hours at room temperature, until you are ready to "pitch" it. (Pitch means to pour in the wort [pronounced wert], which is described below...)
Now it's time to jump into business! Let me disclose this first: brewing is 90% being a janitor and 10% making a product. CLEAN, SANITARY CONDITIONS ARE AN ABSOLUTE MUST!!!

Mmm...clean
...on with the show.
First, we start off by putting our grains into a grain bag and tying it off. I chose a pale malt as my base (and the majority of brewers big and small do the same) and chose a nice crystal malt as my specialty malt to add color and a caramel/roasty flavor. That was set aside and I brought 9 and 1/3 quarts of water up to 166 deg. F. This was for my "partial mash", which, this weekend, was a first for me.
Mashing is best defined as: the reaction between enzymes and starch which produces fermentable sugars from malted barley. [Moore, 65]
After the water was up to temperture, I poured it into the ultra-high tech, specialized partial masher - a $15 Rubbermaid™ 5 gallon cooler.

I let that sit for about 45 minutes with the cap securely fastened and wrapped in dish towels to conserve heat. In the mean time, I brought another 4 and 2/3 cups of water up to 180 deg. F. Once the water was getting on a roll, I performed the process of taking my sweet liquor from the coo...err, partial masher and poured it into my brewpot (carefully, no splashing!) and then put that back into the cooler (again, no splashing). This acts as a quick way to filter out big chunks of malt. As the liquid flows through the grain bed, the grains set and capture the big stuff so you can get a pretty clear wort before the big boil. (I kind of cheated on the last go-round as you can see in the pic below. I used a funnel with an ultra-fine strainer inside as a secondary filter.)

I took the additional water I heated and poured it over the grains as well. This acts as a poor-man's sparging. Sparging is where you take some water and sprinkle it over the grains to give them a final washing.
Once I had all of the wort collected, I brought it to a rolling boil (which took forever!) and added my first round hops for the start of the 60-minute boil.

(The gunk on the side is the hops that have managed to splash up there from the boil.)
I added additional hops at the 15- and 0-minute marks for flavor and aroma, respectively. Also, at the 15 minute mark, I dropped in my new piece of equipment, the immersion chiller. This was to sanitize it for the next step. Cooling the wort.
The immersion chiller is about 25 feet of copper pipe with a garden hose or faucet attachment on one end and a drain tube on the other. You pump cold water from the faucet throught the tube which then exchanges heat from the wort to the copper to the water and goes out of the drain. A normal ice bath for cooling would take around 60 minutes to get the wort down to 70 deg. F. The immersion chiller took 8 minutes. I love that thing!

After the wort was at the right temperature, I transferred it to the fermenting bucket. Then back to the brew kettle. Then back to the fermenting bucket. Then back to the brew kettle. Notice a pattern here? Yeast needs oxygen as a fuel source kind of a like an internal combustion engine in our cars uses air and gasoline to make the car go. The yeast uses O2 and the sugar in the wort to make C2H5OH (ethanol) and CO2 (carbon dioxide). I topped off the fermenter to 5 gallons with some good, bottle water and proceeded to pitch the yeast. Afterwards, I put the top onto the fermenter, made sure it had a good seal and put the air lock on.

And wouldn't you know, just about 24 hours later, the air lock was bubbling like crazy - the yeast was having a party. And in a few weeks, we will too!
- I'll post an update this Friday as I transfer this elixir to the carboy (a big glass bottle) for it's secondary fermentation (allows for a cleaner, "filtered" beer) -
Labels:
American Pale Ale,
beer,
brewing,
homebrewing,
hops,
malt,
mashing,
partial mash,
yeast
0
comments


Monday, March 19, 2007
Beer Madness
Hey everyone,
Check this out: it is the Washington Post's 2007 Beer Madness competition; it's setup ala the NCAA Tournament.
Some interesting upsets, like Yuengling taking a dive in the first round to Shiner Bock, from Shiner, Texas. And Budweiser narrowly eliminating Victory Lager. From the field of 32, we're down to the quarterfinals. My bets are on Pete's vs. Rolling Rock and Dogfish Head vs. Dominion in the Final Four. From there, I have Rolling Rock Extra Pale Lager vs. Dominion Ale in the Championship, with R&R taking it!
"33", baby!
BEER MADNESS!
Saturday, March 3, 2007
THE APA TAKES IT!
Everybody!
Thanks for voting! The ultimate selection for February was the A.P.A. - American Pale Ale.
Stay tuned in for updates and a description on what it takes to successfully brew your own beer!
Also! I am now a proud member of the American Homebrewer's Association!
One final thought on the APA, best summed up by my buddy Ron "Faarooq" Simmons:

DAMN! That's a tasty looking beer!
Thanks for voting! The ultimate selection for February was the A.P.A. - American Pale Ale.
Stay tuned in for updates and a description on what it takes to successfully brew your own beer!
Also! I am now a proud member of the American Homebrewer's Association!
One final thought on the APA, best summed up by my buddy Ron "Faarooq" Simmons:
DAMN! That's a tasty looking beer!
Subscribe to:
Posts (Atom)