Bert Grant's Perfect Porter
Consumed: May 2001
WHAM! Chocolate. POW! Coffee. This was the beer that truly opened the door for me, and led to have a much greater appreciation for experiencing rather than getting sloppy. This is my model for a perfect porter. Call me biased, but this is my blog! :)
I had this beer while on vacation in Florida, and haven't been able to get it here, in Maryland, ever!
I don't know if I will ever have a beer quite as good as this one, as it paved the way for an obsession.
RIP Bert Grant, 2001
Grade: A++
Hoegaarden (on draft, in Ottawa)
Consumed: say, 2005?
Man, what can I say? A gigantic glass filled with bananas and cloves. That about sums it up.
I fell in love with this at first sniff. It had a super pale yellow/green color with a good solid 2 fingers of head. It was so good, that every night on my business trip I went back to the same pub and ordered it!
The restaurant served a wood-fired pizza with grilled chicken and veggies on top that this witbier absolutely complemented perfectly!
It still remains as one of my top 10 beers!
Grade: A+
Do you want to start your own brewery or brewpub? Do you consider yourself a beer geek? Do you want to learn more on brewing, beer styles and trends?
Good, so do we.
We started this blog to compile all of our research on starting a brewery to use ourselves and to share with others who are going through the same process. And we might throw up some beer reviews and how-tos while we're at it!
Sunday, May 13, 2007
Thursday, May 10, 2007
How about a tall, cool glass of water?
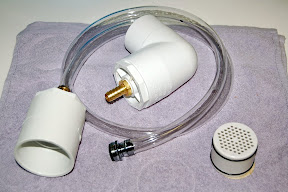
Our water is city water, and even for being in a rural part of our state, it's not the greatest stuff on Earth. To me, it tastes a little tinny, and sometimes gets what I call a beef bullion smell to it that really turns me off. Thank heavens for companies like Brita and PUR! The only problem is, those systems cost mucho dinero for replacement water filters and they are notoriously slow. I could opt to have a system installed in my sink that filters it as it comes out of the tap, but that too costs big bucks. That's when I found a neat article in a recent issue of BYO (Jan/Feb 07). Someone submitted a how-to on creating your own high-flow, high capacity water filter. Stuff of sheer genius! I built it according to spec and must say that I am thoroughly impressed with the simple, $40 setup.
Parts required:
1 2" 90-degree PVC elbow joint
2 2" x 1/2" PVC bushing adapters
1 2" x 3" PVC coupling
1 1/2" male thread x 5/8" hose barb, brass
1 1/2" male thread x 1/2" hose barb, brass
1 universal dishwasher snap adapter
various length of 5/8" vinyl tubing
1 Culligan WHR-140 in-line water filter
teflon (plumbing) tape

It's a super-easy build. First, everything should be thoroughly cleaned with hot soap and water (except for the water filter and tape, of course).
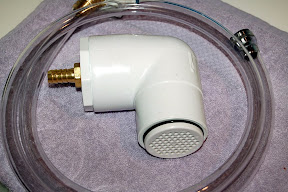
Next, slide the water filter into the smaller diameter end of the elbow joint. The unit won't go in all the way, which is no problem for this build.

Take the coupling and put it over the end that you just installed the water filter in; then install the bushing adapters into each side of the elbow joint.
Wrap a lot of tape around the brass bulkheads and screw them into the bushing adapters. (5/8" bulkhead on the inlet side, the side with the water filter.)
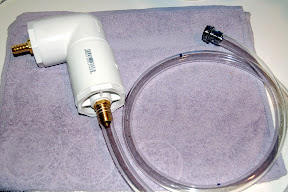
Attach your vinyl tubing and dishwasher adapter (so it can attach to the kitchen faucet) and prime your Culligan water filter. It says to run water through it until you get a steady stream. I found this took about 5 minutes, but due to the age of your filter, YMMV (your mileage may vary).
The filter itself is rated at 10,000 gallons, and cost $10 from Ace Hardware. This was a super-simple and fast build up - it's well worth the investment!
Complete setup

Parts required:
1 2" 90-degree PVC elbow joint
2 2" x 1/2" PVC bushing adapters
1 2" x 3" PVC coupling
1 1/2" male thread x 5/8" hose barb, brass
1 1/2" male thread x 1/2" hose barb, brass
1 universal dishwasher snap adapter
various length of 5/8" vinyl tubing
1 Culligan WHR-140 in-line water filter
teflon (plumbing) tape

It's a super-easy build. First, everything should be thoroughly cleaned with hot soap and water (except for the water filter and tape, of course).
Next, slide the water filter into the smaller diameter end of the elbow joint. The unit won't go in all the way, which is no problem for this build.

Take the coupling and put it over the end that you just installed the water filter in; then install the bushing adapters into each side of the elbow joint.
Wrap a lot of tape around the brass bulkheads and screw them into the bushing adapters. (5/8" bulkhead on the inlet side, the side with the water filter.)
Attach your vinyl tubing and dishwasher adapter (so it can attach to the kitchen faucet) and prime your Culligan water filter. It says to run water through it until you get a steady stream. I found this took about 5 minutes, but due to the age of your filter, YMMV (your mileage may vary).
The filter itself is rated at 10,000 gallons, and cost $10 from Ace Hardware. This was a super-simple and fast build up - it's well worth the investment!
Complete setup

Wednesday, May 9, 2007
Subscribe to:
Posts (Atom)