It took 2 months, but it was well worth the wait! In honor of our daughter's birth, I brewed a special ale. It was originally going to be a gingerbread ale; however, I didn't go with all of the spices one would include in a gingerbread. Instead, I made a straight ginger ale (6% ABV), where I added 1.5 ounces of freshly ground ginger (courtesy of our microplaner) in the last few minutes of the boil. Even though I was outside, and using a propane burner, the aroma of ginger was powerful, wafting through the air, piquing my neighbors interest in what I was making.
Last fall, I had gone to Annapolis Home Brew, where Jim (one of the owners) was nice enough to stay with me to get me set up with the right keg kit.
I also went to Best Buy and bought a small fridge that came without a freezer. This became my little project - to convert it into a homebrew kegerator - when Rachel took our daughter to visit the grandparents.
With the ginger ale fully fermented, I noticed that it was a bit cloudy in the car boy, sooooooo, I remembered back to Lonnie M. over at Ale Nuts.com using unflavored gelatin as a filter in his kegs. Armed with a little more research and knowledge, I filtered and carbonated 5 gallons of awesome beer. I know it's good because it got the official Rachel Seal of Approval!
I think tomorrow may lead me to brewing a Bitter for the 4th of July...
Showing posts with label homebrewing. Show all posts
Showing posts with label homebrewing. Show all posts
Tuesday, June 17, 2008
Tuesday, October 2, 2007
What's Next? Why, Pumpkin Spice Ale, of course!
I want to thank everybody who voted this round! I will be headed to Maryland Homebrew to pick up a whole mess of supplies. Hopefully, this brew will be the first to go into my new Cornelius kegging system. (Hint, hint to someone.) I will have a complete write-up on my steps, and how to throw in some wonderful fresh spices and use some fresh pumpkin.
If you have any feedback, ideas or questions, feel free to reach us by clicking the link on the right-side of this page, under the picture. It'll email us and we'll get back to you ASAP.
SaB
If you have any feedback, ideas or questions, feel free to reach us by clicking the link on the right-side of this page, under the picture. It'll email us and we'll get back to you ASAP.
SaB
Monday, April 2, 2007
Carboy and bottling update
Sorry it's taken me 8012 years to get this uploaded, but here goes our carboy (secondary fermentation vessel) and bottling days extravaganza!
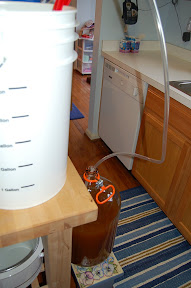
March 24, 2007 - Enter the carboy
So, this is actually quite simple. Get a good siphon going from the primary and let her rip! Just make sure that the carboy is nice and clean and sanitized!
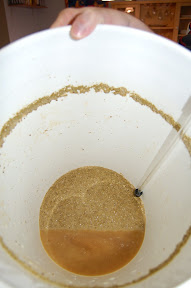
Mmmm, yeasty goodness
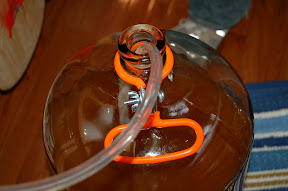
I wrapped the carboy in some beach towels to keep it at as constant a temperature as I could, and to block out any light, slapped my bung and airlock on it and let it sit for a week. (UV radiation, is what actually produces the "skunk" in beer. So, a nice crystal clear carboy would allow all of that through.)
April 1, 2007 - I'm no fool when it comes to bottlin' my life away
This too is pretty easy. Overnight I had cleaned and sanitized two cases of 12 oz bottles to make my life pain-free. Until I dropped an empty bottle, neck first, on my foot. Joy.
Moving on, one must carefully transfer the beer from the carboy to the bottling bucket - might I suggest a siphon, again? This time, I broke part of my racking cane connecting the tubing to it. Still usable though. Joy.
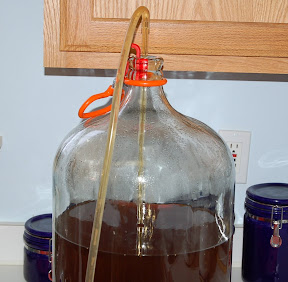
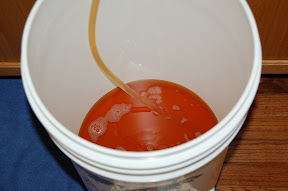
Moving on, I boiled 2 cups of water and 5 oz of corn sugar to act as a primer for the left over yeast in the beer. This will allow the yeast to feed and to carbonate the beer once bottled. Pour that in the mix in the bottling bucket full of beer, attach the bottling wand to some more tubing, connect that to the bottling bucket and let her go! Weee!
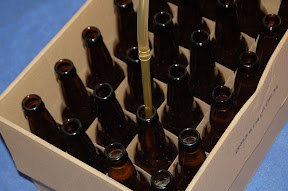
Capping is actually a pretty fun thing to do, with two people you can roll through two cases in about 10 minutes.
I figure a week or two for conditioning and we'll see what we have. Maybe a rite of Spring fest will be in order...
March 24, 2007 - Enter the carboy
So, this is actually quite simple. Get a good siphon going from the primary and let her rip! Just make sure that the carboy is nice and clean and sanitized!
Mmmm, yeasty goodness
I wrapped the carboy in some beach towels to keep it at as constant a temperature as I could, and to block out any light, slapped my bung and airlock on it and let it sit for a week. (UV radiation, is what actually produces the "skunk" in beer. So, a nice crystal clear carboy would allow all of that through.)
April 1, 2007 - I'm no fool when it comes to bottlin' my life away
This too is pretty easy. Overnight I had cleaned and sanitized two cases of 12 oz bottles to make my life pain-free. Until I dropped an empty bottle, neck first, on my foot. Joy.
Moving on, one must carefully transfer the beer from the carboy to the bottling bucket - might I suggest a siphon, again? This time, I broke part of my racking cane connecting the tubing to it. Still usable though. Joy.
Moving on, I boiled 2 cups of water and 5 oz of corn sugar to act as a primer for the left over yeast in the beer. This will allow the yeast to feed and to carbonate the beer once bottled. Pour that in the mix in the bottling bucket full of beer, attach the bottling wand to some more tubing, connect that to the bottling bucket and let her go! Weee!
Capping is actually a pretty fun thing to do, with two people you can roll through two cases in about 10 minutes.
I figure a week or two for conditioning and we'll see what we have. Maybe a rite of Spring fest will be in order...
Labels:
American Pale Ale,
APA,
beer,
brewing,
homebrewing,
how to brew,
starting a brewery
0
comments


Tuesday, March 20, 2007
St. Patrick's Day Brew-Ha-Ha
Hey all,
I promised you pics of the brewing process while making the American Pale Ale that you all voted on. Here we go!
First, I started on Friday night making a starter. The purpose of a starter is to generate more yeast cells so you have an ample amount when you make your big batch of beer. A starter is a super-small batch of beer (1 or 2 quarts) that is made by boiling some water and dried malt extract together for 15 minutes. After that, you cool it down to about 70 deg. F. and add your yeast to the mix and shake it all up. The shaking aerates the beer, which is the fuel necessary for the yeast to convert sugar to alcohol. Here's a pic of what it looks like when it is all said and done:
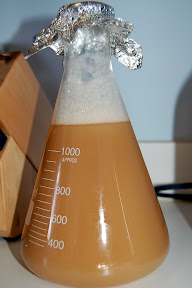
This sits out for about 12-18 hours at room temperature, until you are ready to "pitch" it. (Pitch means to pour in the wort [pronounced wert], which is described below...)
Now it's time to jump into business! Let me disclose this first: brewing is 90% being a janitor and 10% making a product. CLEAN, SANITARY CONDITIONS ARE AN ABSOLUTE MUST!!!
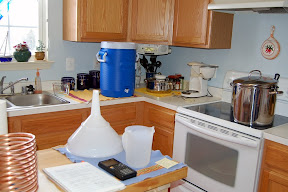
Mmm...clean
...on with the show.
First, we start off by putting our grains into a grain bag and tying it off. I chose a pale malt as my base (and the majority of brewers big and small do the same) and chose a nice crystal malt as my specialty malt to add color and a caramel/roasty flavor. That was set aside and I brought 9 and 1/3 quarts of water up to 166 deg. F. This was for my "partial mash", which, this weekend, was a first for me.
Mashing is best defined as: the reaction between enzymes and starch which produces fermentable sugars from malted barley. [Moore, 65]
After the water was up to temperture, I poured it into the ultra-high tech, specialized partial masher - a $15 Rubbermaid™ 5 gallon cooler.
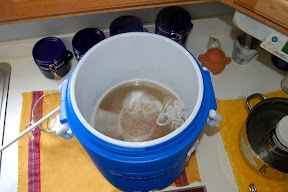
I let that sit for about 45 minutes with the cap securely fastened and wrapped in dish towels to conserve heat. In the mean time, I brought another 4 and 2/3 cups of water up to 180 deg. F. Once the water was getting on a roll, I performed the process of taking my sweet liquor from the coo...err, partial masher and poured it into my brewpot (carefully, no splashing!) and then put that back into the cooler (again, no splashing). This acts as a quick way to filter out big chunks of malt. As the liquid flows through the grain bed, the grains set and capture the big stuff so you can get a pretty clear wort before the big boil. (I kind of cheated on the last go-round as you can see in the pic below. I used a funnel with an ultra-fine strainer inside as a secondary filter.)
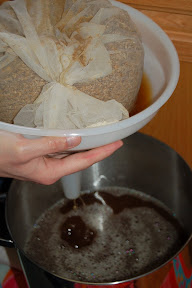
I took the additional water I heated and poured it over the grains as well. This acts as a poor-man's sparging. Sparging is where you take some water and sprinkle it over the grains to give them a final washing.
Once I had all of the wort collected, I brought it to a rolling boil (which took forever!) and added my first round hops for the start of the 60-minute boil.
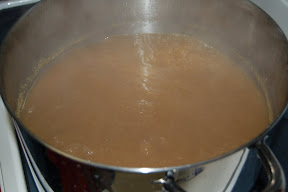
(The gunk on the side is the hops that have managed to splash up there from the boil.)
I added additional hops at the 15- and 0-minute marks for flavor and aroma, respectively. Also, at the 15 minute mark, I dropped in my new piece of equipment, the immersion chiller. This was to sanitize it for the next step. Cooling the wort.
The immersion chiller is about 25 feet of copper pipe with a garden hose or faucet attachment on one end and a drain tube on the other. You pump cold water from the faucet throught the tube which then exchanges heat from the wort to the copper to the water and goes out of the drain. A normal ice bath for cooling would take around 60 minutes to get the wort down to 70 deg. F. The immersion chiller took 8 minutes. I love that thing!
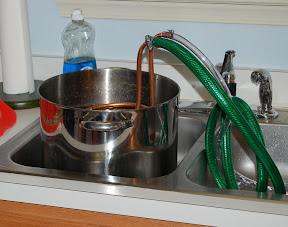
After the wort was at the right temperature, I transferred it to the fermenting bucket. Then back to the brew kettle. Then back to the fermenting bucket. Then back to the brew kettle. Notice a pattern here? Yeast needs oxygen as a fuel source kind of a like an internal combustion engine in our cars uses air and gasoline to make the car go. The yeast uses O2 and the sugar in the wort to make C2H5OH (ethanol) and CO2 (carbon dioxide). I topped off the fermenter to 5 gallons with some good, bottle water and proceeded to pitch the yeast. Afterwards, I put the top onto the fermenter, made sure it had a good seal and put the air lock on.
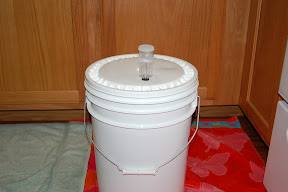
And wouldn't you know, just about 24 hours later, the air lock was bubbling like crazy - the yeast was having a party. And in a few weeks, we will too!
- I'll post an update this Friday as I transfer this elixir to the carboy (a big glass bottle) for it's secondary fermentation (allows for a cleaner, "filtered" beer) -
I promised you pics of the brewing process while making the American Pale Ale that you all voted on. Here we go!
First, I started on Friday night making a starter. The purpose of a starter is to generate more yeast cells so you have an ample amount when you make your big batch of beer. A starter is a super-small batch of beer (1 or 2 quarts) that is made by boiling some water and dried malt extract together for 15 minutes. After that, you cool it down to about 70 deg. F. and add your yeast to the mix and shake it all up. The shaking aerates the beer, which is the fuel necessary for the yeast to convert sugar to alcohol. Here's a pic of what it looks like when it is all said and done:
This sits out for about 12-18 hours at room temperature, until you are ready to "pitch" it. (Pitch means to pour in the wort [pronounced wert], which is described below...)
Now it's time to jump into business! Let me disclose this first: brewing is 90% being a janitor and 10% making a product. CLEAN, SANITARY CONDITIONS ARE AN ABSOLUTE MUST!!!
Mmm...clean
...on with the show.
First, we start off by putting our grains into a grain bag and tying it off. I chose a pale malt as my base (and the majority of brewers big and small do the same) and chose a nice crystal malt as my specialty malt to add color and a caramel/roasty flavor. That was set aside and I brought 9 and 1/3 quarts of water up to 166 deg. F. This was for my "partial mash", which, this weekend, was a first for me.
Mashing is best defined as: the reaction between enzymes and starch which produces fermentable sugars from malted barley. [Moore, 65]
After the water was up to temperture, I poured it into the ultra-high tech, specialized partial masher - a $15 Rubbermaid™ 5 gallon cooler.
I let that sit for about 45 minutes with the cap securely fastened and wrapped in dish towels to conserve heat. In the mean time, I brought another 4 and 2/3 cups of water up to 180 deg. F. Once the water was getting on a roll, I performed the process of taking my sweet liquor from the coo...err, partial masher and poured it into my brewpot (carefully, no splashing!) and then put that back into the cooler (again, no splashing). This acts as a quick way to filter out big chunks of malt. As the liquid flows through the grain bed, the grains set and capture the big stuff so you can get a pretty clear wort before the big boil. (I kind of cheated on the last go-round as you can see in the pic below. I used a funnel with an ultra-fine strainer inside as a secondary filter.)
I took the additional water I heated and poured it over the grains as well. This acts as a poor-man's sparging. Sparging is where you take some water and sprinkle it over the grains to give them a final washing.
Once I had all of the wort collected, I brought it to a rolling boil (which took forever!) and added my first round hops for the start of the 60-minute boil.
(The gunk on the side is the hops that have managed to splash up there from the boil.)
I added additional hops at the 15- and 0-minute marks for flavor and aroma, respectively. Also, at the 15 minute mark, I dropped in my new piece of equipment, the immersion chiller. This was to sanitize it for the next step. Cooling the wort.
The immersion chiller is about 25 feet of copper pipe with a garden hose or faucet attachment on one end and a drain tube on the other. You pump cold water from the faucet throught the tube which then exchanges heat from the wort to the copper to the water and goes out of the drain. A normal ice bath for cooling would take around 60 minutes to get the wort down to 70 deg. F. The immersion chiller took 8 minutes. I love that thing!
After the wort was at the right temperature, I transferred it to the fermenting bucket. Then back to the brew kettle. Then back to the fermenting bucket. Then back to the brew kettle. Notice a pattern here? Yeast needs oxygen as a fuel source kind of a like an internal combustion engine in our cars uses air and gasoline to make the car go. The yeast uses O2 and the sugar in the wort to make C2H5OH (ethanol) and CO2 (carbon dioxide). I topped off the fermenter to 5 gallons with some good, bottle water and proceeded to pitch the yeast. Afterwards, I put the top onto the fermenter, made sure it had a good seal and put the air lock on.
And wouldn't you know, just about 24 hours later, the air lock was bubbling like crazy - the yeast was having a party. And in a few weeks, we will too!
- I'll post an update this Friday as I transfer this elixir to the carboy (a big glass bottle) for it's secondary fermentation (allows for a cleaner, "filtered" beer) -
Labels:
American Pale Ale,
beer,
brewing,
homebrewing,
hops,
malt,
mashing,
partial mash,
yeast
0
comments
Saturday, March 3, 2007
THE APA TAKES IT!
Everybody!
Thanks for voting! The ultimate selection for February was the A.P.A. - American Pale Ale.
Stay tuned in for updates and a description on what it takes to successfully brew your own beer!
Also! I am now a proud member of the American Homebrewer's Association!
One final thought on the APA, best summed up by my buddy Ron "Faarooq" Simmons:

DAMN! That's a tasty looking beer!
Thanks for voting! The ultimate selection for February was the A.P.A. - American Pale Ale.
Stay tuned in for updates and a description on what it takes to successfully brew your own beer!
Also! I am now a proud member of the American Homebrewer's Association!
One final thought on the APA, best summed up by my buddy Ron "Faarooq" Simmons:
DAMN! That's a tasty looking beer!
Subscribe to:
Posts (Atom)